Pages

BoBerry Biscuits

>> Saturday, May 23, 2009

*WARNING*
This recipe is NOT gluten-free (apologies to my gf readers out there.)

A couple of friends of mine from North Carolina are constantly singing the praises of a restaurant chain called Bojangles. Their rhapsodic descriptions of BoBerry Biscuits inspired my to dig up the recipe online and surprise them with my best efforts at recreating the BoBerry.

BoBerry Biscuits:
- 2 cups Flour
- 1 cup milk
- 1/3 cup of sugar
- 5 tbs of low-fat butter or margarine.
- 4 tsp baking powder
- 1 tsp salt
- 3/4 cup dried (dehydrated) blueberries

Glaze:
- 1 cup of sifted powdered sugar
- 1/8 cup of water
- 1 teaspoon of vanilla
- ½ teaspoon of fresh lemon juice

Directions:
One hour before baking cut up the butter into 1/8 inch - 1/4 inch slices and place in freezer.

Preheat oven to 450F. Mix salt, sugar, flour, blueberries and baking powder in a bowl. Add cold milk to dry ingredients and mix.

Add the slices of butter and fold them QUICKLY into the dough. You do not want them to melt, they will create the layers in your biscuits.

Once the butter chunks are evenly distributed, move dough to floured cutting board and roll flat to about ¼ - ½ thick (or to desired thickness) and cut Biscuits with a 2" biscuit or cookie cutter. Place in oven and bake for 7-12 minutes, until golden brown at the edges.

Melt 1 tablespoon of butter in the microwave, and paint finished biscuits with pastry brush.
Mix glaze ingredients in a bowl, and drizzle over BoBerry Biscuits.
ENJOY!

If the guys' reactions were any indication, this recipe was pretty close to the real thing. Even if you've never been to Bojangles, I can pretty much promise you will love these babies. They are flaky, buttery, easy to make and the slightly tart coating is bowl-licking good.

Read more...

Zukesketti

>> Tuesday, May 19, 2009


Since becoming a (mostly) gluten-free lady, the thing I miss most, hands down, is pasta. Yes I have tried potato pastas, brown rice pastas, white rice pastas, corn pastas, you name it. As a pasta snob, I just haven't found a noodle that gives me al dente firmness without being gummy, mushy or having a weird aftertaste. This recipe for zucchini "spaghetti" tastes remarkably like the real thing and best of all, it comes out al dente! You have to try it to believe it. Oh yeah, also zucchini is a vegetable, not a bloat-inducing carb monster. It has Vitamin C, Protein, Fiber, Potassium, Folate, Vitamin A and Lutein. Does your average noodle have all that?

Makes 1 serving
- 2 small to medium zucchini
- 2 tbsp butter
- 1/2 clove garlic, finely chopped
- 1/4 cup toasted, unsalted sliced almonds
- 14 cup shaved parmesan cheese

Using a mandolin slicer set to shred or julienne, slice zucchini. (This is a little tricky. I've included a picture of the mandolin so you can see what it looks like.) Cut off and discard the ends of the zucchini then set it on it's side on the mandolin. Be careful not to cut off your fingertips as you slide the zucchini into the blades. Rotate the zucchini after a few passes over the blade. Discard the soft, seeded center once you've shredded all the way around. It gets too mushy when it cooks and it's also too soft to slice.

If you don't have a mandolin, simply use a knife to cut the zucchini into "matchsticks."

In a small non-stick skillet heat 1 tbsp butter and chopped garlic until garlic begins to brown.

Toss in the zucchini "noodles" and stir until they absorb the butter and begin to soften, about 1 minute. Add the remaining butter and continue to stir until the butter is absorbed and the zucchini is slightly softened but still firm. Taste it to make sure the texture is to your liking (for me it was about two to three minutes.)

Remove from heat and top with almonds and parmesan and enjoy!

You can also try this with your favorite pasta sauce! YUM!

Read more...

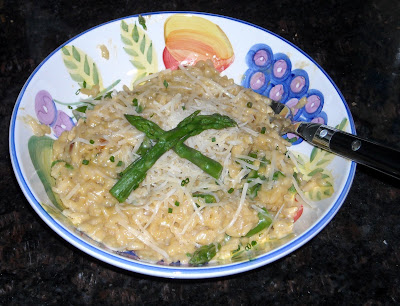
Cheesy Asparagus Risotto

>> Friday, May 15, 2009


I always thought risotto must be really hard to make because I only had REALLY good risotto at fancy restaurants. Turns out, it's not hard at all. The trick is to stay with it. Put on some music in the kitchen and be patient, don't go too far away from the pan. Also: taste! The best way to prevent your risotto from turning to glue is noticing when the rice starts to soften and finishing it up at that point. If you wait to long, you will have asparagus flavored gum. Mmmmmmmm. If you baby your risotto, it will pay off. Also, you can experiment with cheeses. The gouda makes this dish really rich and a bit nutty.

- 10-15 medium to thin spears of asparagus (fewer if you use big ol fat ones)
- 32 oz chicken broth
- Approx. 2 tbs. olive oil
- 1/4 cup diced onion
- 2 cloves of garlic, minced
- 1 cup uncooked arborio rice
- 1/2 cup grated parmesan cheese plus a little extra to sprinkle
- Splash of good white wine
- 1/4-1/3 cup grated gouda cheese
- 1/4 cup half and half
- finely chopped chives to suit your taste

Break off the tough ends of the asparagus


Set the asparagus in a basket steamer in a pot with water, cover and bring to a boil. Steam, covered for 5-10 minutes depending on the thickness of your asparagus stalks. Test with a fork to make sure the stalks are tender but just slightly firm. Remove asparagus and chop into 1/2 - 1 inch pieces and reserve. You can steam the asparagus at the same time as you are working on the rice mixture.

Heat broth in a small pot, bring to a boil then reduce to a simmer, keep at a simmer.

Heat Olive Oil in a medium pan on medium heat and onions, cook until they begin to soften then add garlic and cook until both just begin to caramelize (the garlic cooks faster than the onions so don't put them in together. Learned this the hard way.)

Add the rice to the onions and garlic and cook for about two minutes, stirring frequently to prevent the rice from burning or sticking.

Add 1/2 cup of the simmering broth to the rice and shake the pan around to get the rice to absorb the liquid. As soon as most of the liquid is absorbed, add another half cup of broth. Continue this until most or all of the broth is gone, the rice is tender but not soft and the mixture is thick and creamy. This whole process takes about 15-20 minutes. Add a splash of good white wine to taste. I LOOOOOOVE King Shag from Trader Joe's and it's the perfect wine to drink with this dish once you finish.


As you add more liquid you can try to "flip" the risotto in the pan. It's kind of fun but can also be dangerous so be cautious.


Remove the mixture from the heat and add the cheese, half and half and asparagus. Reserve a few asparagus tips and some cheese for garnish.

Transfer the risotto to bowls, snip some fresh chives on top using kitchen scissors and garnish with the cheese and asparagus tips.
YUM!

Read more...

Tomatermelon Goat Cheese Salad with Avocado

>> Monday, May 4, 2009


I had some leftover goat cheese from my pizza and wanted to use it up in something easy and tasty. I decided to make a summery salad with a tangy dressing and a surprise element. The avocado in this dish may sound a little weird but the creaminess balances out the acid in the tomato and the sharp tang of the goat cheese. The slightly salty dressing makes the watermelon extra sweet and juicy. There are a million ways you could play with this salad to adjust it to your tastes (try basil or fresh mint instead of chives) but it's pretty fantastic as is (if I do say so myself)

For Dressing

- 3-4 oz goat cheese (reserve a bit of goat cheese to put on top of the salad)
- 4 tbsp buttermilk
- 3 tsp. white wine vinegar
- 1 tsp. dijon mustard
- 1-2 tsp. sugar to taste
- sea salt and pepper to taste
- 2 stalks fresh chives, snipped into teeny tiny pieces
- splash of white wine

For Salad

- 3-4 large Heirloom tomatoes, cut into sections
- 4-5 Cherry or grape tomatoes, halved
- 1/2" - 1" chunks of watermelon (as much as you like, I used about 2 cups)
- 1 avocado cut into small chunks
- 1-2 tbsp goat cheese

Mix veggies and fruit together in a large bowl.

Whisk together dressing ingredients.

Plop a few dollops of goat cheese on top.

Pour dressing over salad and enjoy!

Read more...